Campaign Management with Targetor
This guide explains how to manage survey campaigns using Targetor, Askalot's campaign orchestration service. Targetor enables you to organize research projects, import respondents, assign interviewers, and track survey completion across demographic segments.
Core Concepts
Entity Hierarchy
Targetor organizes survey research using this hierarchy:
Project
├── Questionnaire (links to QML file)
├── Sampling Strategy (defines target demographics)
├── Respondent Pool (generated or manual)
│   └── Respondents (survey targets)
└── Campaign
    ├── Pool (references respondents)
    ├── Interviewers (optional, for phone & in-person interviews)
    └── Surveys (individual sessions)
From Respondents to Surveys
The following diagram illustrates how individual surveys are generated from a large respondent population:
flowchart TB
    subgraph source["📊 Respondent Database"]
        RG["<b>All Respondents</b><br/><small>Thousands of contacts with<br/>demographic attributes</small>"]
    end

    subgraph strategy["🎯 Sampling Strategy"]
        SS["<b>Target Distribution</b><br/><small>Gender: 50/50<br/>Age: 18-24 (15%), 25-34 (30%)...</small>"]
    end

    subgraph pool["👥 Respondent Pool"]
        RP["<b>Representative Sample</b><br/><small>Selected respondents matching<br/>target demographics</small>"]
    end

    subgraph campaign["📋 Campaign"]
        direction LR
        Q["Questionnaire<br/><small>(QML)</small>"]
        CA["Campaign<br/>Assignment"]
        Q ~~~ CA
    end

    subgraph surveys["✉️ Surveys"]
        S1["Survey 1"]
        S2["Survey 2"]
        S3["Survey 3"]
        SN["..."]
    end

    RG -->|"Filter & Select"| SS
    SS -->|"Generate Pool"| RP
    RP -->|"Assign to Campaign"| CA
    Q -->|"Define Questions"| CA
    CA -->|"Create Individual<br/>Survey Instances"| S1
    CA --> S2
    CA --> S3
    CA --> SN

    style source fill:#e8f4fd,stroke:#1976d2
    style strategy fill:#fff3e0,stroke:#f57c00
    style pool fill:#e8f5e9,stroke:#388e3c
    style campaign fill:#f3e5f5,stroke:#7b1fa2
    style surveys fill:#fce4ec,stroke:#c2185b
Projects group related questionnaires, pools, and campaigns for organizational purposes.
Questionnaires reference QML files that define the survey structure, questions, and validation rules.
Sampling Strategies define target demographic distributions (e.g., 50% male, 50% female) with configurable factors and selection algorithms. Strategies are reusable templates—the same strategy can generate multiple pools over time, each selecting fresh respondents.
Respondent Pools are collections of respondents selected for a specific campaign. Pools can be:
- Strategy-generated: Algorithmically selected to match target distributions
- Manual: Hand-picked respondents for specific use cases
Pools Are Not Reusable
Unlike strategies, pools are designed for single-campaign use. Respondents who have participated in research are generally not selected again—this respects their time and avoids survey fatigue. When you need respondents for a new campaign, generate a fresh pool from your strategy rather than reusing an existing pool.
Campaigns are active data collection efforts. Each campaign links one questionnaire to one respondent pool.
Respondents are survey targets with demographic data. They access surveys via magic links without platform authentication.
Interviewers are platform users who facilitate interviews by phone or in person. They are optional—campaigns can run in self-administered mode where respondents complete surveys independently.
Respondents vs. Users
Understanding the distinction between respondents and users is critical:
| Aspect | Respondent | User |
|---|---|---|
| Purpose | Survey target | Platform operator |
| Authentication | Magic link (no login) | Platform login |
| Demographics | Age, gender, location, custom attributes | Role-based access |
| Source | CRM import, panel provider, manual entry | Created in Roundtable |
Respondents receive survey invitations via email with magic links. They never log into the platform.
Users with the interviewer role can facilitate surveys on behalf of respondents in interviewer-assisted mode (phone or in-person).
Getting Started
Step 1: Create a Project
Projects organize your research. Navigate to Targetor and click "New Project".
Project Settings:
- Name: Descriptive name (e.g., "Q1 2026 Customer Research")
- Description: Brief overview of research objectives
- Owners: Users who can manage the project
Organizing and Reordering Projects
The Projects page lets you arrange your projects to match how you work:
- Named groups: Use "New Group" in the page header to create a named section (e.g., "Active studies", "Archived"), then rename or delete groups inline. Projects that are not in any group appear in an Ungrouped section at the bottom.
- Drag to reorder: Grab a project card by its handle and drag it to reorder it within a group or move it to another group. You can also reorder the groups themselves.
- Automatic saving: Every move is saved immediately — there is no separate save step.
If you can only view a project (you are not one of its owners), it appears without drag handles or group controls — reordering is available to project owners and administrators.
Step 2: Create a Questionnaire
- Click "New Questionnaire"
- Select your project
- Choose the starting content: the blank starter template, or a copy of an existing questionnaire. A copy is independent — later edits to the original never affect it
- Set the status (draft, active, archived)
There is no version field to fill in. The revision number you see beside a questionnaire is simply how many versions its QML has accumulated — it is maintained for you and cannot be set by hand.
QML Design
Refine the questionnaire in Armiger, where you get live validation and the flow diagram. See Creating Surveys for QML syntax.
A questionnaire keeps a full version history: every save adds a new version rather than replacing the last one, and nothing in that history is ever overwritten. That is what makes the fielded-version guarantee below possible.
Before you attach a questionnaire to a campaign, review its Instrument Health to confirm the design is both logically sound and well-constructed.
Step 3: Create a Campaign
Create a campaign to begin data collection:
- Click "New Campaign"
- Select project and questionnaire
- Configure campaign settings:
- Name: Campaign identifier
- Status: Draft, Scheduled, Active, Paused, Completed
- Start/End Dates: Optional scheduling
Attaching a questionnaire publishes it
Attaching a questionnaire to a campaign is the moment it goes in front of respondents, so it is the one moment Askalot refuses an unsound design. The questionnaire's logic is formally verified first; if verification finds errors, the campaign is not saved and you are told what to fix. Work in progress stays freely saveable everywhere else — only this step is gated.
On success, the campaign is pinned to that exact questionnaire version. Every survey it produces is served that version for its whole life, so editing the questionnaire afterwards can never change the instrument under a respondent mid-interview. To roll a revised questionnaire out to an existing campaign, open the campaign and save it again — that re-verifies the current version and re-pins to it.
Step 4: Import Respondents
Import survey targets into your respondent database. Targetor supports multiple import methods:
Manual Entry:
Create respondents one at a time with full demographic profiles.
Bulk Import (CSV):
name,email,age,gender,location,external_id,source_system
John Smith,[email protected],34,male,"New York, USA",CRM-1001,salesforce
Jane Doe,[email protected],28,female,"London, UK",CRM-1002,salesforce
API Integration:
Import from CRM systems, panel providers, or custom databases via the REST API.
Step 5: Create a Respondent Pool
Organize respondents into a pool for campaign assignment. Two approaches:
Manual Pool:
- Click "New Pool"
- Name the pool and add description
- Select respondents from the list
- Save the pool
Strategy-Generated Pool:
- Create a Sampling Strategy with target distributions
- Click "Generate Pool" from the strategy
- Review quality metrics (RMSE, Chi-square)
- Confirm to create the pool
See Sampling Strategies for detailed guidance.
Step 6: Assign Pool to Campaign
Link a respondent pool to your campaign:
- Navigate to "Campaign Assignments"
- Select a pool from the dropdown
- Optionally assign interviewers for phone or in-person interviews
- Click "Sync Surveys" to create survey records for all pool respondents
Instrument Health
Every questionnaire has an Instrument Health view that tells you whether the design is ready to field — open it from the questionnaire's detail page or its entry in the questionnaire list. It combines two independent verdicts that answer different questions about the same instrument.
Logic (Z3 proof)
This is the logical soundness verdict. Askalot formally verifies the questionnaire's branching logic: a validated instrument is mathematically proven to contain no unreachable questions and no contradictory skip conditions — the guarantee is a proof, not a spot-check. A questionnaire whose current version has not passed verification shows as "Not validated" — you can keep working on it, you just cannot field it. See Creating Surveys for how validation happens during design.
Design quality
Logical soundness tells you the instrument works; it says nothing about whether it is well-designed. The design-quality scorecard fills that gap by grading seven independent dimensions of questionnaire craft:
| Dimension | What it looks at |
|---|---|
| Instrument economy | Whether the questionnaire is as short as it can be for what it measures |
| Quality-gate density | Use of validation and consistency checks that catch bad answers |
| Verification coverage | How much of the instrument is covered by logical verification |
| Structural complexity | Whether the branching structure stays comprehensible |
| Order coherence | Whether questions follow a sensible, non-jarring order |
| Path diversity | Whether respondents on different routes get a coherent experience |
| Burden & balance | Respondent effort and balance across sections |
Each dimension is graded on its own as strong, adequate, or weak (or "not applicable" when a dimension does not apply). There is deliberately no single blended score — a combined number would let a strong dimension mask a weak one, so you always see the seven grades side by side.
The scorecard is recomputed each time the questionnaire is saved and again when it is attached to a campaign. A questionnaire whose content could not be analysed at all shows "not assessed", and the logic verdict still displays independently. Use the scorecard to decide whether an instrument is polished enough to attach to a live campaign, and which dimensions to revisit if it is not.
Survey Types
Campaign-Generated Surveys
Surveys created through a campaign are linked to specific respondent pools and tracked in campaign statistics:
- Create Campaign: Define a campaign with questionnaire and respondents
- Send Invitations: Surveys are generated for each respondent when invitations are sent
- Track Progress: Campaign dashboard shows completion rates and statistics
Campaign-generated surveys are linked to the campaign for tracking and reporting.
Ad-Hoc Surveys
Surveys can also be created on the spot without campaign association:
- Access SirWay: Log in with appropriate permissions
- Select Questionnaire: Choose from available questionnaires
- Create or Select Respondent: Enter respondent details or select existing
- Execute Survey: Complete the survey immediately
Ad-hoc surveys are not tracked in campaign statistics. Use cases include:
- Quick testing of questionnaires
- Opportunistic data collection
- Pilot interviews before campaign launch
- Training interviewers on survey flow
For detailed information about survey execution, see Survey Execution.
Campaign Modes
Self-Administered Mode
Respondents complete surveys independently:
- Send Invitations: Email magic links to respondents
- Respondent Clicks Link: Opens survey in SirWay
- Complete Survey: Respondent navigates questions at their own pace
- Automatic Tracking: Progress and completion recorded
Best for:
- Online panels
- Email-based outreach
- High-volume data collection
- Digitally literate audiences
Interviewer-Assisted Mode (Phone & In-Person)
Interviewers facilitate surveys on behalf of respondents by phone or in person:
- Assign Interviewers: Add users with
interviewerrole to campaign - Distribute Workload: Assign specific respondents to each interviewer
- Conduct Interviews: Interviewer operates the survey interface
- Enter Responses: Interviewer records respondent's answers
Best for:
- In-person interviews
- Phone surveys
- Populations with limited digital access
- Situations requiring clarification or translation
Managing Respondents
Respondent Profile
Each respondent has:
| Field | Description |
|---|---|
| Name | Display name |
| For survey invitations | |
| Phone | Optional contact number |
| Demographics | Age, gender, location (free text, typically "City, Country") |
| External ID | Reference from source system |
| Source System | Origin (CRM, panel, manual) |
| Custom Attributes | Key-value pairs for targeting — including any geography finer than location |
Custom Attributes
Custom attributes enable flexible targeting and filtering:
{
  "customer_segment": "premium",
  "purchase_frequency": "monthly",
  "region": "northeast",
  "state": "NY",
  "zip_code": "10001"
}
Use custom attributes to:
- Filter respondents by business-specific criteria
- Target specific segments for campaigns
- Enrich survey data with contextual information
- Hold any geography finer than
location— city, state, postal code, country as separate values
A custom attribute is a first-class targeting input: name it custom_attributes.<key> anywhere a respondent attribute is accepted — a sampling strategy factor, an external-input mapping that prefills an answer from the respondent record, or a calibration target during weighting.
Notification Preferences
Respondents can set communication preferences:
- Email: Receive invitations via email
- SMS: Receive invitations via text message
- Push: Receive push notifications
- None: Do not contact (opt-out)
Targetor respects these preferences when sending invitations.
Managing Interviewers
Adding Interviewers
Only users with the interviewer role can be assigned to campaigns:
- Open the campaign and click "Campaign Assignments"
- In the "Assign Interviewers (Optional)" section, select interviewers from the user list
- Confirm assignment
Workload Distribution
For interviewer-assisted campaigns, distribute respondents among interviewers:
- Navigate to "Manage Workload"
- View unassigned respondents
- Drag-and-drop or bulk-assign to interviewers
- Monitor completion by interviewer
Workload Statistics:
| Metric | Description |
|---|---|
| Assigned | Respondents in interviewer's queue |
| Completed | Surveys finished |
| In Progress | Surveys started but not complete |
| Pending | Not yet started |
| Completion Rate | Percentage complete |
Sending Invitations
Magic Links
Targetor generates unique, time-limited URLs for each respondent:
Magic links:
- Authenticate the respondent without login
- Direct to the correct survey
- Expire after a configurable period (default: 7 days)
- Track invitation status
Invitation Workflow
- Navigate to campaign "Send Invitations"
- Select recipients:
- Specific respondents
- All uninvited respondents
- By demographic filter
- Customize email template (optional)
- Send invitations
Invitation Status:
| Status | Meaning |
|---|---|
| Not Invited | No invitation sent yet |
| Invited | Invitation sent, survey not started |
| In Progress | Survey started |
| Completed | Survey finished |
Invitation status records that the invitation was handed over for delivery, not that it arrived in the recipient's inbox. Delivery outcomes are a separate matter — see below.
Delivery Limits and Bounced Addresses
Askalot bounds how much mail any single address can receive, and stops sending altogether to mailboxes that have proven dead. Both rules are applied at the moment of sending, so they cover every message the platform produces: survey invitations and reminders, but also email verification and password resets.
A per-recipient hourly limit. One address receives at most five emails per hour from the same part of the platform. Both the number and the length of the window are configurable, so an operator can adjust them for your deployment.
An ordinary invitation send is unaffected — it sends one message per recipient, however many recipients there are. The limit bounds repeated sending to one person, not the size of a campaign: overall volume is monitored rather than capped, so a large fielding is never throttled by this rule.
A hard bounce suppresses the address everywhere. When the receiving mail server reports that an address does not exist, Askalot records the bounce and stops sending to it — from every part of the platform, not only the campaign that triggered it. The address stays suppressed until an operator lifts it. That is deliberate: a dead mailbox does not come back on its own, and continuing to send to it damages deliverability for every other recipient.
Soft bounces and spam complaints do not suppress. A full mailbox or a temporary rejection is a transient condition rather than a dead address, and a spam complaint is a request to stop a particular campaign rather than evidence that the address is invalid. Both are recorded, and mail to that address keeps flowing.
Test and example addresses are never sent to at all. Some domains exist
specifically so that they can never receive mail — example.com, example.net,
example.org and anything ending in .test, .invalid, .localhost or
.local are reserved by internet standard for documentation and testing. An
operator can also register your deployment's own test domains alongside them.
Mail addressed to any of these is stopped before it leaves the platform. Nothing fails and nothing is reported as an error, because these addresses normally appear in sample data, demonstrations and automated tests, where a failure would be noise rather than information. The record of the attempt says the message was discarded rather than sent, so the distinction is available to an operator reviewing what the platform actually delivered.
This matters most if you are importing respondents: an address on one of these domains will never receive an invitation, no matter how many times the campaign is sent. Sending to them would also harm delivery for everyone else, because mail providers treat a high proportion of undeliverable addresses as a signal that a sender should be blocked.
A suppressed respondent still shows as Invited
Because status reflects the handover rather than the delivery, a respondent whose address is suppressed remains Invited while nothing reaches them. Correcting the address — and asking an operator to lift the suppression if the same address is now valid again — is what restores delivery.
Campaign Lifecycle
Status Transitions
stateDiagram-v2
    [*] --> Draft

    Draft --> Scheduled : Schedule
    Draft --> Active : Start

    Scheduled --> Active : Start / Time arrives
    Scheduled --> Aborted : Abort

    Active --> Paused : Pause
    Active --> Completed : Complete
    Active --> Aborted : Abort

    Paused --> Active : Resume
    Paused --> Aborted : Abort

    Completed --> [*]
Aborted --> [*]| Status | Description |
|---|---|
| Draft | Campaign configuration in progress. Cannot send invitations. |
| Scheduled | Campaign ready to launch at specified date/time. |
| Active | Data collection in progress. Invitations can be sent. |
| Paused | Temporarily halted. Existing links remain valid. Can be resumed. |
| Completed | Data collection finished. No new responses accepted. |
| Aborted | Campaign terminated early. Cannot be resumed. |
Monitoring Progress
The campaign dashboard displays:
- Response Rate: Completed / Total Respondents
- Completion by Segment: Progress by demographic group
- Interviewer Performance: Completion by assigned interviewer
- Daily Trends: Response volume over time
Degraded Surveys
Some problems only show up while a survey is being answered: a piece of questionnaire logic that cannot be evaluated, a value carried over from a respondent record that the question refuses, a repeated section asked for a subject the questionnaire never declared. Askalot does not abandon a respondent mid-interview when this happens — the survey continues — but it records what it had to work around, and the campaign page reports it.
A Degraded Surveys panel appears on the campaign page whenever at least one survey in the campaign recorded a problem. Each survey is listed once, at its most serious finding, and links straight to that survey's detail page. A campaign whose surveys all ran cleanly shows no panel at all.
Findings are graded by what they mean for your data, not by which part of the platform noticed them:
| Severity | What it means | What to do |
|---|---|---|
| Critical | Questionnaire logic failed part-way through, so anything computed after it may be wrong. These surveys are excluded from dataset extraction. | Fix the logic and re-field. The survey stays readable for diagnosis. |
| Degraded | An answer or a route through the questionnaire was kept even though a rule the questionnaire declared could not be applied. | Review the affected question — usually a condition that references something unavailable at that point. |
| Informational | The data is unaffected; the flow simply covered less ground than a value asked for. | Worth knowing, rarely worth acting on. |
One broken question, many degraded surveys
A single flawed question degrades every survey that reaches it, so a long list usually means one defect, not many. Open one of them: the detail page names the question.
Reviewing an Individual Survey
Open a survey — from the surveys list, or straight from the Degraded Surveys panel — to see the exact route that respondent took. The page is organised as one collapsible section per block visit, in the order they were walked:
- A block asked once appears once. A block the respondent came back to appears again, as a separate section — the two passes can hold different answers, and showing them separately is the only way to see that.
- A repeated (roster) section appears once per subject, labelled with that subject, each carrying only that subject's answers.
- Each section shows how many questions it covered and how long it took; each question shows its answer and its own response time, plus a per-attempt breakdown when it was answered more than once.
- Sections that recorded a critical or degraded finding open automatically, with the finding shown in place; informational-only sections stay collapsed.
Response times are measured per question, from the moment it is put in front of the answerer to the moment the answer comes back — not across the session as a whole, so a late start or a gap between sittings is not charged to a question. Refreshing the page does not restart a question's clock. Times are reported exactly as observed, with no trimming: a long span is a real observation about that interview, and what counts as implausible is a judgement for you to make against the distribution across the campaign.
Sampling Strategies
Sampling strategies are reusable templates that define target demographic distributions for generating representative respondent pools. Unlike pools (which are single-use), a strategy can be used repeatedly to generate fresh pools for different campaigns—each time selecting new respondents who haven't recently participated in research.
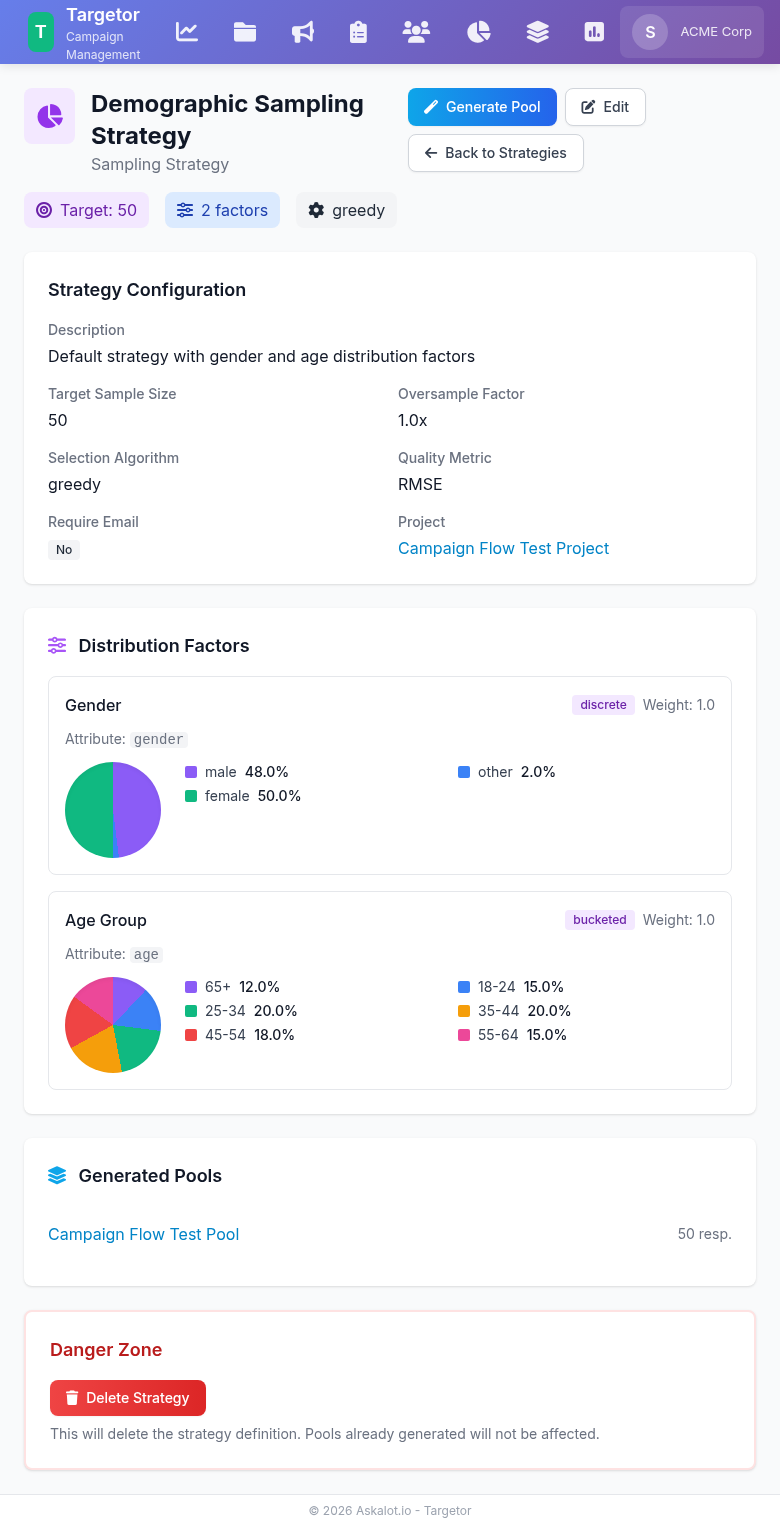
A sampling strategy with gender and age distribution factors. The pie charts visualize target proportions for each demographic category.
Default Strategy
In non-private organizations, every user starts with a default sampling strategy that includes standard demographic factors:
- Gender: male (48%), female (50%), other (2%)
- Age groups: 18-24 (15%), 25-34 (20%), 35-44 (20%), 45-54 (18%), 55-64 (15%), 65+ (12%)
The default strategy is ready to use for generating representative pools without any configuration. It is read-only — you cannot edit or delete it, ensuring a consistent baseline across your organization.
When you need different target distributions or additional demographic factors, create a custom strategy for your project.
Creating a Custom Strategy
- Navigate to Strategies in Targetor
- Click "New Strategy"
- Configure settings:
- Name: Descriptive identifier
- Project: Associated project (optional)
- Target Size: Desired pool size
- Algorithm: Selection method (greedy or random_constrained)
Distribution Factors
Add factors to define target demographics:
Discrete Factor (categorical):
Bucketed Factor (numerical ranges):
A factor's source can be a respondent attribute — age, gender, location, or any custom attribute — or, on a strategy produced by Advancing a Strategy, a survey response column. Only the first kind can be sampled on: pool generation runs before anyone has answered, so a strategy carrying response-column factors is refused for generating, previewing and refreshing a pool, with an error naming the factors involved. Advanced strategies exist to grade a sample that has already been fielded.
Selection Algorithms
Greedy Selection: - Iteratively selects respondents that minimize overall distribution error - Best quality scores but slower for large pools - Recommended for critical research with strict requirements
Random Constrained: - Random selection with per-category quotas - Faster execution with reasonable quality - Suitable for large-scale screening or panels
Quality Metrics
After pool generation, review quality metrics:
| Metric | Description | Target |
|---|---|---|
| RMSE | Root Mean Square Error | < 0.05 |
| MAE | Mean Absolute Error | < 0.03 |
| Chi-Square | Statistical fit test | < threshold |
| Max Deviation | Largest category error | < 0.10 |
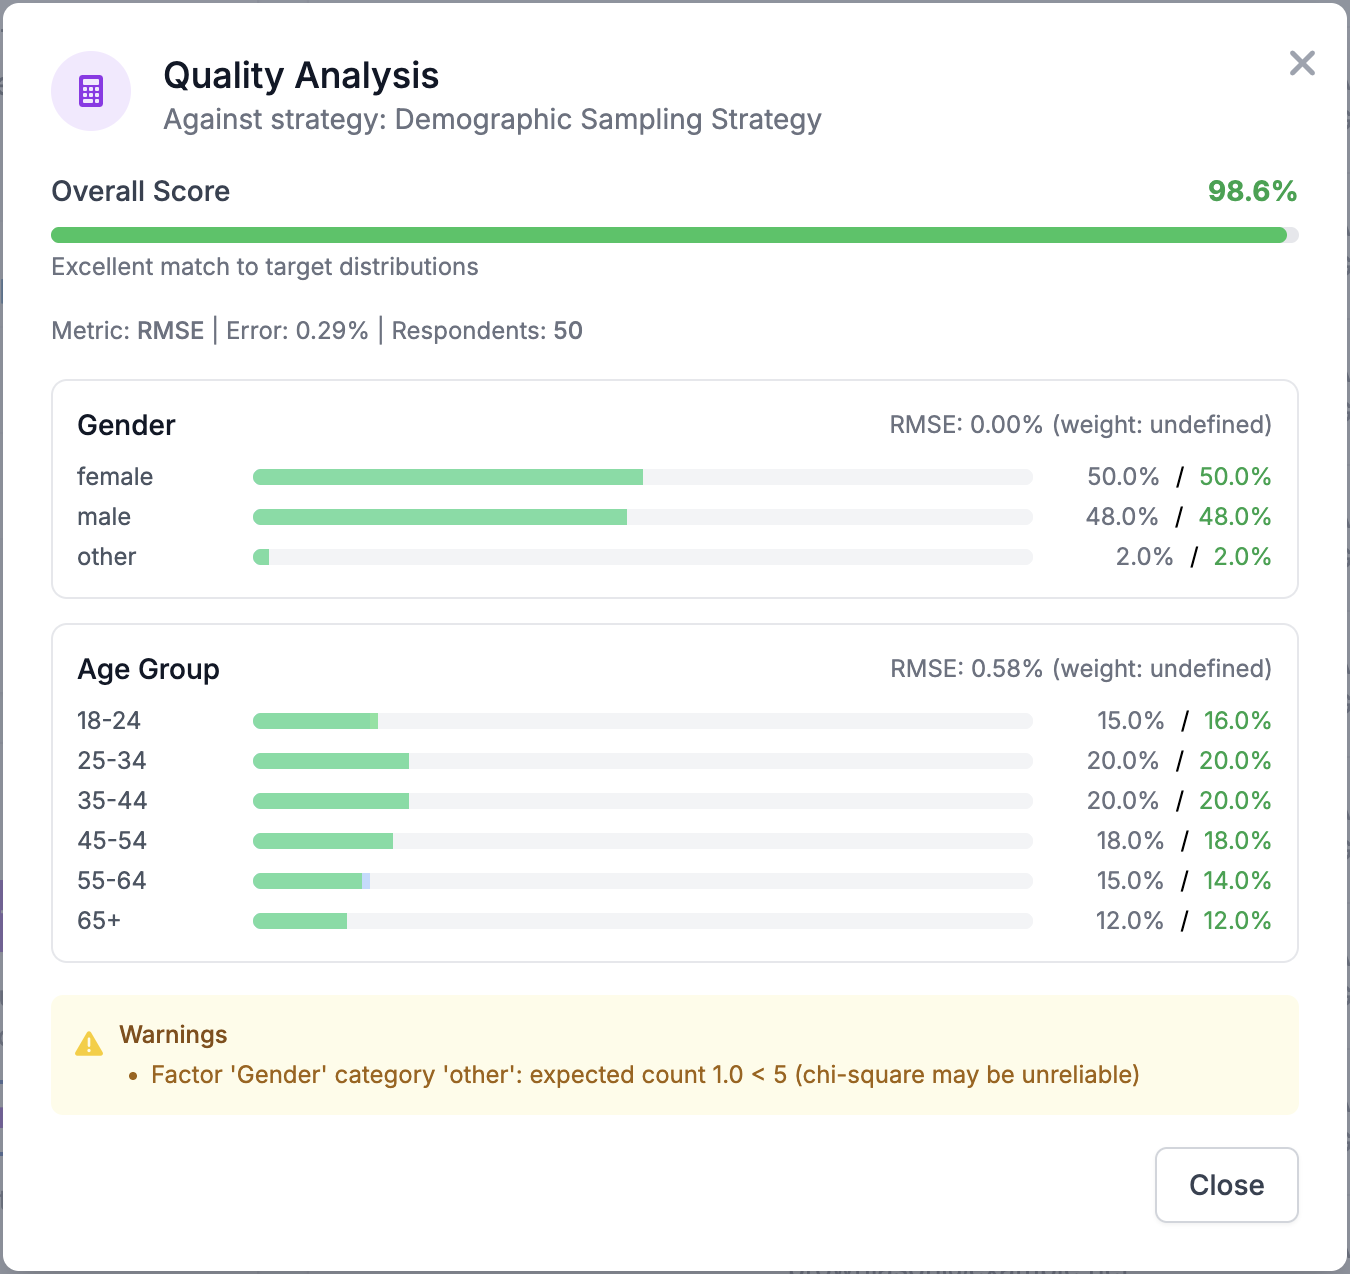
Quality analysis comparing target distributions against actual pool composition. Bar charts show target (left) vs. actual (right) percentages for each category.
Generating a Pool
- Open strategy details page
- Click "Generate Pool"
- Review preview with quality metrics
- Enter pool name and description
- Click "Generate" to create pool
The generated pool is linked to the source strategy for potential refresh operations.
Respondent Pools
Respondent pools organize respondents for campaign assignment and enable batch operations.
Pool Operations
Merge Pools: Combine multiple pools into one: 1. Navigate to Pools index 2. Click "Merge Pools" 3. Select source pools (2+) 4. Name the merged pool 5. Confirm (original pools are deleted by default)
Split Pool: Divide a pool into smaller segments: 1. Open pool details 2. Click "Split Pool" 3. Configure split count (2-N) 4. Choose method: - Random: Shuffle respondents before splitting - Sequential: Maintain original order 5. Confirm (original pool is deleted by default)
Refresh Pool: Re-run the source strategy to update a strategy-generated pool: 1. Open pool details (must be strategy-generated) 2. Click "Refresh from Strategy" 3. Confirm to regenerate with current respondent population
Recalculate Quality: Update quality metrics without regenerating: 1. Open pool details 2. Click "Recalculate Quality" 3. View updated metrics against the source strategy
Managing Pool Respondents
Add or remove respondents from manual pools: 1. Open pool details 2. Click "Manage Respondents" 3. Use filters to find respondents 4. Add/remove as needed
Strategy-Generated Pools
Pools generated from strategies cannot have respondents added or removed manually. Use refresh to update with the algorithm.
Demographic Targeting
Monitoring Quotas
Targetor monitors actual responses against target distributions and alerts when segments are under or over-represented.
Dashboard Indicators: - Green: Within 5% of target - Yellow: 5-10% deviation - Red: >10% deviation
Quota Enforcement
Two enforcement modes:
Soft Quotas: Monitor only. Allow responses beyond quota.
Hard Quotas: Stop accepting responses when quota reached. Redirect respondents to "quota full" page.
Best Practices
Campaign Design
- Set clear objectives before creating campaigns
- Test questionnaires in draft mode before launch
- Oversample by 2-3x to account for non-response
- Stagger invitations to manage response volume
Respondent Management
- Deduplicate before import to avoid duplicate surveys
- Validate email addresses to minimize bounces
- Set appropriate expiration for magic links
- Respect opt-outs and notification preferences
Interviewer-Assisted Interviews
- Balance workloads evenly across interviewers
- Monitor completion rates to identify struggling interviewers
- Provide clear instructions for interview protocols
- Review early responses to catch issues quickly
Data Quality
- Track incomplete surveys to identify problematic questions
- Monitor per-question response times for outliers — the survey detail page breaks them down question by question
- Check the Degraded Surveys panel early in fielding, while a logic defect can still be fixed
- Check demographic distributions against targets
- Export incrementally to catch issues early
Integration
REST API
Programmatic access to all Targetor functionality:
# List campaigns
GET /api/v1/campaigns

# Create respondent
POST /api/v1/respondents
{
  "name": "John Smith",
  "email": "[email protected]",
  "age": 34,
  "gender": "male"
}

# Create pool with respondents
POST /api/v1/pools
{
  "name": "Q1 Sample",
  "respondent_ids": ["uuid1", "uuid2"]
}

# Assign pool to campaign
PUT /api/v1/campaigns/{id}
{
  "pool_id": "pool-uuid"
}
See REST API Reference for complete documentation.
MCP Integration
For AI-assisted campaign management, Targetor operations are available through MCP (Model Context Protocol) tools covering projects, campaigns, respondents, pools, sampling strategies, and workload management.
See the MCP Interface Reference for the complete list of available tools and their parameters.
Troubleshooting
Common Issues
Invitations not delivered:
- Check respondent email validity
- Verify notification preference is not "none"
- Check spam/junk folders
- Check whether the address has been suppressed by an earlier hard bounce — see Delivery Limits and Bounced Addresses
- Check whether the same address was mailed repeatedly within the hour, which the per-recipient limit refuses
Low response rates:
- Send reminder invitations
- Extend magic link expiration
- Review questionnaire length and complexity
- Consider incentives
Quota imbalances:
- Adjust sampling strategy
- Send targeted reminders to under-represented groups
- Import additional respondents for specific segments
Interviewer bottlenecks:
- Redistribute workload
- Add additional interviewers
- Review interview duration